Search This Blog

Note to Readers

The majority of the text on this blog is written by Hikaru, a ball jointed doll. Try not to question it. The text written in pink font is commentary from Hikaru's human friend, Anna. Basically Hikaru does most of the writing and Anna keeps her from getting too out of hand.

Featured Post

Bjd Unboxing: Aimerai Cat Doll?

Friday, November 3, 2017

Of Bjd Fashion: Birthday Surprise Outfits Part 2, Suspender Skirt/Puffy Shorts Tutorial

This post may contain affiliate links, please check out my disclosures page for more info.  Thanks!

We are continuing on from yesterday’s celebration, here is a brief recap in case you were unfortunate enough to miss it.

Cute doll outfits part 2, suspender skirt/puffy shorts for yosd bjd with pattern.

Yuna and Sakura have both joined our doll family over a year ago, so Anna made these adorable outfits for them.

Cute doll outfits part 2, suspender skirt/puffy shorts for yosd bjd with pattern.

Yesterday, Anna created a thorough tutorial for their lovely raglan sleeve tops.

Cute doll outfits part 2, suspender skirt/puffy shorts for yosd bjd with pattern.

So today, we will learn to make the rest of the ensemble.  Yuna’s lace trimmed skirt and Sakura’s “puffy” shorts, both with removable suspender straps.  A wonderful asset to any yosd sized doll wardrobe.  Let the tutorial begin.


Yosd Suspender Skirt/Puffy Shorts Tutorial


Materials needed:

If you are a bit of a beginner with sewing I recommend checking out this video tutorial for fitted doll dresses, it demonstrates several techniques used for these pieces.

Yosd Suspender Skirt Puffy Shorts Pattern (493x640)

Here is your pattern.  It is based on Sakura’s measurements, which can be found in the doll’s profile page.

Let’s start with the skirt.

Making a suspender skirt for a yosd ball jointed doll, with pattern.

First cut one waist band and one skirt according to the skirt measurements.  You are welcome to shorten the skirt if your doll is a little on the shorter side.

Making a suspender skirt for a yosd ball jointed doll, with pattern.

Next, we pin and hem the bottom of the skirt.

Making a suspender skirt for a yosd ball jointed doll, with pattern.

If you wish, you can also pin on some lace along the hem too, sewing both the hem and the lace at the same time. 

Making a suspender skirt for a yosd ball jointed doll, with pattern.

Now it’s time to gather the top of the skirt to fit the waistband (beginners, don’t forget to checkout that video).

Making a suspender skirt for a yosd ball jointed doll, with pattern.

Carefully pin the skirt to the waistband with right sides together.  Spread the gathers evenly as you pin.

Making a suspender skirt for a yosd ball jointed doll, with pattern.

Sew the pieces together and trim a little of the excess fabric to reduce some bulk.

Making a suspender skirt for a yosd ball jointed doll, with pattern.

Now we will start to tackle the back opening.  Start to pin and hem the end of the skirt, but only about an inch down from the gathered top.  I use my thumb as a guide. 

Repeat at the other end.  Now is also a good time to check the fit on your doll.

Making a suspender skirt for a yosd ball jointed doll, with pattern.

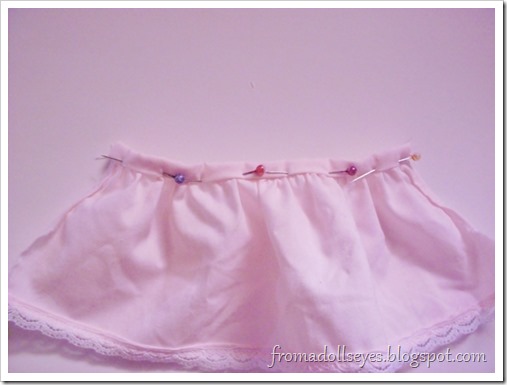
Now we continue with the waistband.  Fold top edge of the waistband down and pin.
Making a suspender skirt for a yosd ball jointed doll, with pattern.

Then fold it over the gathered edge of the skirt and re-pin it in place.

Making a suspender skirt for a yosd ball jointed doll, with pattern.

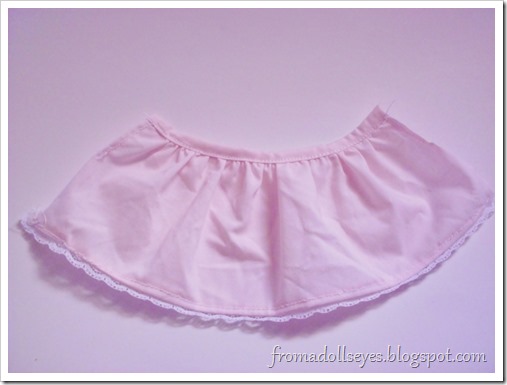
You will now turn the skirt around and sew the waistband along the edge near the skirt.  It helps to move the pins one by one to this side of the skirt, especially if you’re using a sewing machine.
Making a suspender skirt for a yosd ball jointed doll, with pattern.

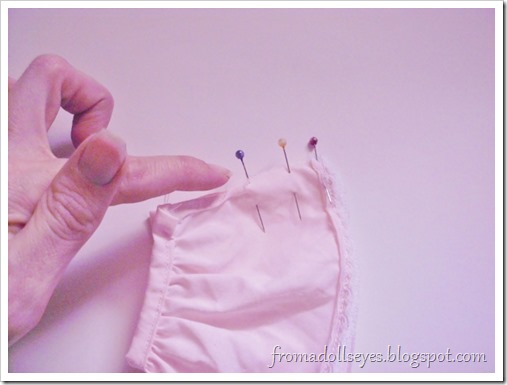
Just about done, now to do the back seam.
Making a suspender skirt for a yosd ball jointed doll, with pattern.

Pin the ends of the skirt together and sew the back seam.

Making a suspender skirt for a yosd ball jointed doll, with pattern.

All that’s left to do is add snaps or Velcro.

Making a suspender skirt for a yosd ball jointed doll, with pattern.

Now the skirt is finished, that is if you want it to be just a skirt.

But we want to add straps.

Making a suspender skirt for a yosd ball jointed doll, with pattern.

Easily done.  Just cut 2 pieces for the straps.

Making a suspender skirt for a yosd ball jointed doll, with pattern.

Fold the edges…

Making a suspender skirt for a yosd ball jointed doll, with pattern.

…pin and sew.

Making a suspender skirt for a yosd ball jointed doll, with pattern.

Then attach with snaps on both end of the straps.

This is what makes them detachable.  You could also make them permanent by only using snaps on one end and sewing the other ends to the skirt.

Now let’s get on with the shorts.

Making puffy shorts for a yosd ball jointed doll, with pattern.

The shorts are made very much the same way as the skirt.  You do cut two pieces instead of one, but you still start by hemming them.

Making puffy shorts for a yosd ball jointed doll, with pattern.

You will then sew elastic along the hem. 

If you are doing this by hand instead of machine, you might find it easier to thread the elastic through the hem instead.  Kind of like what we did yesterday with tops.

Making puffy shorts for a yosd ball jointed doll, with pattern.

Either way, you will end up with this, a nicely gathered bottom.

Making puffy shorts for a yosd ball jointed doll, with pattern.

Then you pin and sew them together for the back seam (as marked on the pattern).

Making puffy shorts for a yosd ball jointed doll, with pattern.

This is where it becomes just like the skirt.  Gather the top to fit the waistband…

Making puffy shorts for a yosd ball jointed doll, with pattern.…sew it just the same way…

Making puffy shorts for a yosd ball jointed doll, with pattern.

…pin and hem the ends (this will be the fly)…

Making puffy shorts for a yosd ball jointed doll, with pattern.

…then finish sewing the waistband.

This is a good time to try it on your doll.  Make sure it will go around them nicely and that there is enough room between the legs.

Making puffy shorts for a yosd ball jointed doll, with pattern.

Now you pin and sew the “front” seam from fly down to the crotch.

Making puffy shorts for a yosd ball jointed doll, with pattern.

Then finally pin and sew up the inseam and crotch.

Making puffy shorts for a yosd ball jointed doll, with pattern.

Add some snaps or Velcro, and if you still want to…

Making puffy shorts for a yosd ball jointed doll, with pattern.

…add some straps.

Now you have a cute pair of puffy suspender shorts.  Feel free to decorate the skirt and shorts as you wish.

Have fun sewing!


Give it a try:


Read More »

Thursday, November 2, 2017

Of Bjd Fashion: Birthday Surprise Outfits Part 1 with Raglan Sleeve Top Tutorial

This post may contain affiliate links, please check out my disclosures page for more info.  Thanks!

We celebrated Anna’s birthday last Sunday, but today we have two more reasons to celebrate.  It has been well over a year since both Yuna and Sakura have arrived.  To commemorate this fine occasion, Anna has sewn brand new outfits for the both of them.

Matching outfits to be exact.

Cute new doll outfits, and a raglan sleeve top tutorial with pattern for yosd ball jointed dolls.

Don’t they just look darling.  There is an adorable pink lace trimmed skirt with suspender straps for Yuna, and gathered shorts for Sakura also with suspenders (she means puffy shorts). 

Cute new doll outfits, and a raglan sleeve top tutorial with pattern for yosd ball jointed dolls.

The ingenious thing is that the straps can be removed to show off the delightful blouses.

A raglan sleeve top tutorial with pattern for yosd ball jointed dolls.

They have raglan style sleeves and are trimmed with lace and ribbon along the neckline.  Anna said they were made from a vintage handkerchief that had scalloped edges. 

A raglan sleeve top tutorial with pattern for yosd ball jointed dolls.

Another handy thing about these blouses is the closure on the back.  Makes changing one’s clothing a breeze.

I find these yosd sized tops so delightful that I have convinced Anna to produce a sewing pattern and tutorial for the benefit of all.  Now let the tutorial begin.


Yosd Ball Jointed Doll Raglan Sleeve Top Tutorial

Materials needed:

  • Pattern
  • Fabric or a handkerchief
  • Matching thread
  • Basic sewing supplies
  • Thin lace
  • Thin ribbon
  • Snaps or Velcro
  • Something to thread ribbon (large needle, small safety pin, etc.)
  • Sewing machine is optional
  • Some sewing knowledge is helpful

If you are a bit of a beginner with sewing I recommend checking out these two video tutorials, they demonstrate some of the techniques you will need to make these tops:

Yosd bjd raglan sleeve top pattern and tutorial

Here is the pattern, it was designed based on Sakura’s measurements which are listed on the profile page.

Cute new doll outfits, and a raglan sleeve top tutorial with pattern for yosd ball jointed dolls.

First you need to cut the pieces as indicated by the pattern. 

I lined up the bottom of the pattern along the edge of a cute handkerchief, so I could use the pretty scalloped edge instead of hemming the shirt.  This is optional but a great idea.

Cute new doll outfits, and a raglan sleeve top tutorial with pattern for yosd ball jointed dolls.

Now to start making the shirt, you first pin the sleeves to the front piece as shown and sew.  Repeat with the back pieces.

Making a top for a yosd ball jointed doll.

Then you pin and hem along the top edge of the shirt, this is your neckline.

Making a top for a yosd ball jointed doll.

Next is to pin and hem the sleeves.  If you prefer, you can hem the sleeves before sewing them to the front and back pieces.  I would especially recommend it if you are sewing by machine instead of by hand.

Making a top for a yosd ball jointed doll.

Pin together the front and back pieces, and then sew up the sides of the shirt and the sleeves.  It is a good idea to try the shirt on you doll at this step to ensure a good fit.

Cute new doll outfits, and a raglan sleeve top tutorial with pattern for yosd ball jointed dolls.

Now it actually looks like a shirt.  This is the point where you will hem the bottom of the shirt.  Since I used the edge of a handkerchief I get to skip this step.

Making a top for a yosd ball jointed doll.

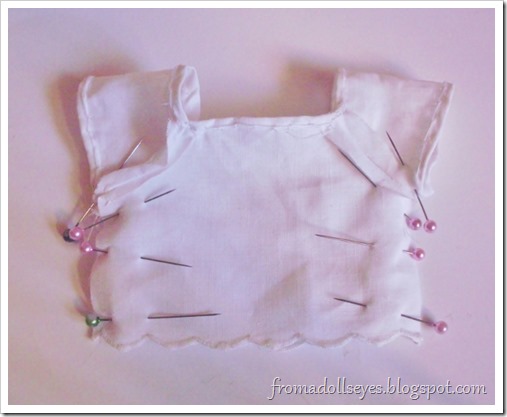
Now for the fun part, embellishing.  Pin the thin lace along the neckline.  Sew along the top and bottom edge of the lace.  This will used as a casing for your ribbon.

Making a top for a yosd ball jointed doll.

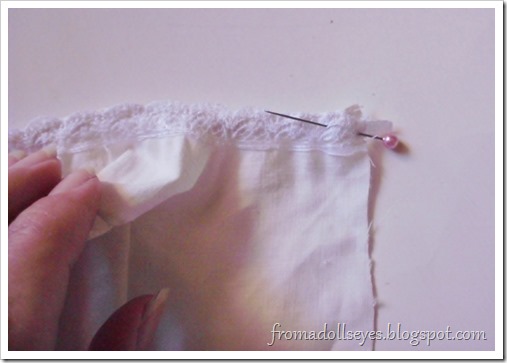
Use the tool of your choice to thread the ribbon under the lace.  Make sure to pin the ribbon at the end to keep it from pulling out.

Cute new doll outfits, and a raglan sleeve top tutorial with pattern for yosd ball jointed dolls.

Pull the ribbon out a bit at the center before threading it through to the other end of the shirt.

Cute new doll outfits, and a raglan sleeve top tutorial with pattern for yosd ball jointed dolls.

You will tie this bit of ribbon in a bow later, so make sure it is long enough.

Making a top for a yosd ball jointed doll.

Now time to take care of the back opening by pinning and hemming the edge.

Cute new doll outfits, and a raglan sleeve top tutorial with pattern for yosd ball jointed dolls.

Repeat on the other end.

Cute new doll outfits, and a raglan sleeve top tutorial with pattern for yosd ball jointed dolls.

Now we just need to sew on the closure of your choice.  Either snaps or small pieces of Velcro.  It is a good idea to try the shirt on your doll at this point to adjust the fit.

Cute new doll outfits, and a raglan sleeve top tutorial with pattern for yosd ball jointed dolls.

All that’s left is to pull the ribbon to gather the neckline and tie it into a cute bow.  Enjoy!


Cute new doll outfits, and a raglan sleeve top tutorial with pattern for yosd ball jointed dolls.

Now that the tutorial is done, let us discuss the other pieces.  Anna didn’t just make matching outfits for these two adorable dolls.

Cute lace headband for a ball jointed doll.

For Yuna, there is this beautiful headband with a wonderful lace bow.  The precious little dear has become quite fond of lace, so this hair piece suits her well.  It is made using the same techniques from Anna’s doll headband tutorial.

Cute new doll outfits, and a raglan sleeve top tutorial with pattern for yosd ball jointed dolls.

“That bow is so cute! It’s as cute as mine, don’t you think?  We match now! Do like it? Do you like mine? Do you like it as much as cake?!”

“….um…”

“Me too!”

Cute new doll outfits, and a raglan sleeve top tutorial with pattern for yosd ball jointed dolls.

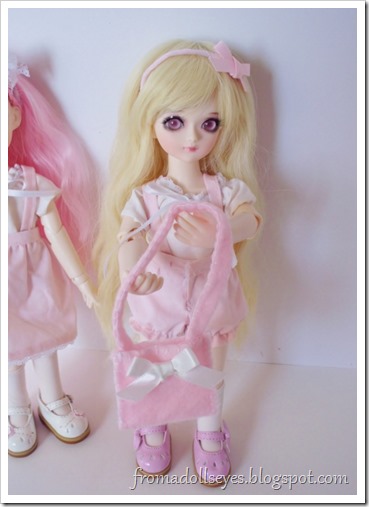
For Sakura, there is this felt bag.  Anna made several delightful bags for myself and Usagi some time ago (see Of Bjd Fashion: Felt Doll-sized Purses Tutorial) and a small one for Yuna (see Of Bjd Fashion: Yuna’s First Outfit with Tutorial), so Sakura greatly wished to have one of her very own.  She was so thrilled to receive it.

Cute new doll outfits, and a raglan sleeve top tutorial with pattern for yosd ball jointed dolls.

“It looks just like Usagi’s bag, but the bow is better!  And it fits me, and it’s pink, and…”

Maybe a tad too thrilled.

That is all for today, but do not despair.  There will be more to enjoy tomorrow with another tutorial to complete the charming little outfits. 

Until then, be at peace my dear readers.


Give it a try:

Read More »

Wednesday, November 1, 2017

Doll Owner’s Corner: Behind the Scenes Round 7

First of the month, time for another Doll Owner’s Corner.  When I, the doll owner, talk about anything at all.

This month’s topic:

Doll Bloopers

That’s right, it’s round seven of the fun doll photos (check here for the previous set).  The theme for this set is “getting the dolls to cooperate”. 

There are times when taking photos of dolls that you have an idea for a particular pose, but the doll doesn’t want to go that way.  This is especially the case with ball jointed dolls despite how incredibly “poseable” they are supposed to be.

Fun bjd bloopers.  Doll Photography.

Take this photo, it’s one of the outtakes from this post when Hikaru, Usagi, and Sakura were suppose to give us their “super cute” pose.  You can see that Usagi got it right, but the other two are a different story.

Fun bjd bloopers.  Doll Photography.

Here’s one when Yuki got his body (see Bjd Unboxing: Doll Family H Body and New Shoes?).  He was just suppose to sit there holding Shiro the deer, something he does constantly. 

Somehow this time the sight of the camera made him topple over knocking poor Shiro’s head off.  Luckily no harm came to either of them.

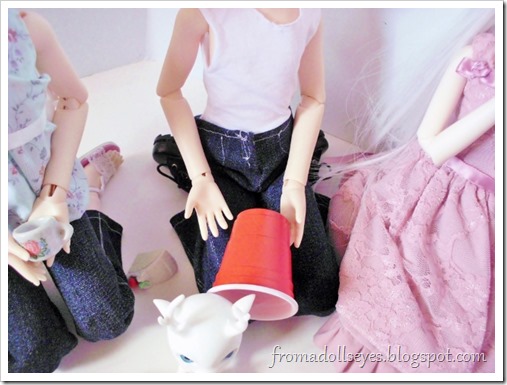
Fun bjd bloopers.  Doll Photography.

Here’s another with Yuki from this tea party.  All he had to do was hold on to a plastic cup, but down it went, spilling imaginary tea on Shiro.  That is one patient little deer.


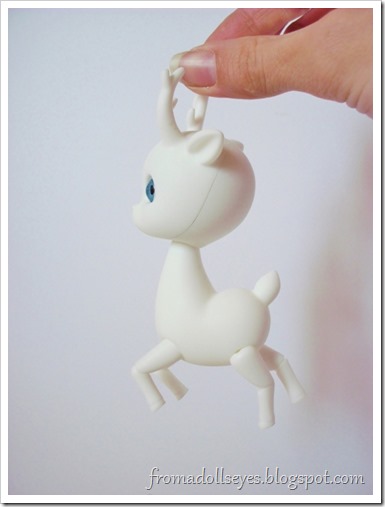
Speaking of deer, remember this post of Shiro flying like a reindeer?  Here’s how it was really shot. 

Fun bjd bloopers, and how I made a deer fly.  Doll Photography.

I first took this photo of me holding Shiro by the antlers….

Fun bjd bloopers, and how I made a deer fly.  Doll Photography.

…And then I took this photo holding Shiro a bit lower.

Then I used this free image editing software to add the top half of the second photo to the first photo. 

Then voila!  Instant flying deer shot.  Because sometimes you have to manipulate some photos to get the shots you want.

That’s it for this time.  Please leave a comment if you have any suggestions for more fun bjd photos.  Otherwise look forward to more doll stuff coming soon.


Read More »

Sunday, October 29, 2017

Happy Birthday 2017


Happy Birthday 2017 from the ball jointed dolls of From a Doll's Eyes.

Today is a special day indeed.  It happens to be Anna’s birthday, though as usual I will not reveal which one.  I will however ask you to join us in wishing her a very happy birthday.  May there be many more to come.


Read More »

Friday, October 13, 2017

Of Bjd Lifestyle: DollyBird Vol. 12, a Japanese Doll Magazine

Some time ago, Anna placed an order at an online bookstore called Kinokuniya.  This particular shop specializes in Japanese books and magazines, so naturally Anna was drawn to them.

Review of the Japanese doll magazine, Dolly Bird.  As seen through the eyes of a ball jointed doll.

And thus, a few weeks later, these sewing and fashion magazines arrived in the mail.  The other ones have their appeal, however it’s the center title that deserves special consideration. 

It’s an issue of DollyBird, a Japanese magazine for doll collectors.  Anna purchase volume 12 of this fine publication because of it’s focus on ball jointed dolls.

Review of the Japanese doll magazine, Dolly Bird.  As seen through the eyes of a ball jointed doll.

The cover photo alone is quite stunning, both with and without the dust cover. 

Review of the Japanese doll magazine, Dolly Bird.  As seen through the eyes of a ball jointed doll.

The inside is just as beautiful as the outside.  The first thing we see inside is an article on bjd photography.

Review of the Japanese doll magazine, Dolly Bird.  As seen through the eyes of a ball jointed doll.

It is a pity that no one here can read Japanese, however we can still enjoy the beautiful photos.

Review of the Japanese doll magazine, Dolly Bird.  As seen through the eyes of a ball jointed doll.

Anna, I want you to study these photos carefully to improve your camera skills.  I want all my photos to look this exquisite.

You do realize how long it takes to get that good at photography, plus if I focused that much time on photos I would have less time to make things for you.

…Taking some things into consideration, I suppose your skills are adequate enough, at least for now.

Review of the Japanese doll magazine, Dolly Bird.  As seen through the eyes of a ball jointed doll.

What is she doing in this magazine?!

Hikaru, this is a magazine for doll collectors.  That means many different types of dolls, including Barbie who is popular in Japan too. 

Anyway, why take that attitude with vintage styled Barbies too?  I would think you of all dolls would find them more appealing, at least compared to the regular Barbie dolls you seem to despise.

Hmm…I suppose she isn’t as tacky looking as the plastic horrors at the toy store.

Review of the Japanese doll magazine, Dolly Bird.  As seen through the eyes of a ball jointed doll.

“Oh my, what an adorable outfit, isn’t it Miss Hikaru?”

You are quite right Momoko, it is a rather chic looking ensemble.  It would look wonderful on me.

Review of the Japanese doll magazine, Dolly Bird.  As seen through the eyes of a ball jointed doll.

Now let us get back on topic, here is a fashion spread featuring male ball jointed dolls.  Intriguing.

Review of the Japanese doll magazine, Dolly Bird.  As seen through the eyes of a ball jointed doll.

These are perfect, this is a excellent example of the styles you should be wearing, Yuki.  Don’t you agree?

Review of the Japanese doll magazine, Dolly Bird.  As seen through the eyes of a ball jointed doll.

“…What is that?…You want me to wear a bonnet?…”

Oh for goodness sake, no!  And it’s a head dress, not a bonnet.

Review of the Japanese doll magazine, Dolly Bird.  As seen through the eyes of a ball jointed doll.

This, Anna!  You simply must make something like this for me.  It is gorgeous.

Review of the Japanese doll magazine, Dolly Bird.  As seen through the eyes of a ball jointed doll.

“Oooh, yes.  The bunny ears would look so cute on you Hikaru! :)”

The dress, Usagi.  I was referring to the dress.

There are are so many beautiful pieces of doll clothing in this catalog, I mean magazine.  And it just gets better.

Review of the Japanese doll magazine, Dolly Bird.  As seen through the eyes of a ball jointed doll.

I’ve found that one of the most wonderful things about this magazine is that there are included patterns and instructions for some of the pieces.  Meaning Anna can quite easily make them for me.

Review of the Japanese doll magazine, Dolly Bird.  As seen through the eyes of a ball jointed doll.

However, Anna says that all the bjd patterns are for SD sized dolls.  Still, I believe Anna has more than enough skill to resize the patterns to fit me. 

And although the instructions are in Japanese, there are plenty of clear photos to follow.  Meaning she can’t use that as an excuse either.

Review of the Japanese doll magazine, Dolly Bird.  As seen through the eyes of a ball jointed doll.

Overall, I found this doll magazine to be a most wonderful and worthwhile purchase and I look forward to seeing more issues in the future.

Be at peace my dear readers.

Read More »

Popular Posts