Search This Blog

Note to Readers

The majority of the text on this blog is written by Hikaru, a ball jointed doll. Try not to question it. The text written in pink font is commentary from Hikaru's human friend, Anna. Basically Hikaru does most of the writing and Anna keeps her from getting too out of hand.

Featured Post

Bjd Unboxing: Aimerai Cat Doll?

Showing posts with label Downloads. Show all posts

Saturday, September 13, 2025

Of Bjd Fashion: Simple T-Shirt Outfit for Our Yosd Boy Part 1

This post may contain affiliate links, please check out my disclosures page for more info. Thanks!

After far, far too long, Anna has made some clothes for us. Specifically for Makoto, our only yosd boy doll.

Make a yosd ball jointed doll sized t-shirt.
His new outfit consists of a t-shirt with longish sleeves, a simple pair of elastic waist shorts, and a sensible pair of socks. They are a touch on the plain side for my taste, but Makoto seems happy with them.

Simple as they are, basic pieces are still necessary for all doll wardrobes, so I have persuaded Anna to produce tutorials for these pieces.

First up, is how to sew a basic yosd sized t-shirt.

Yosd Sized T-Shirt Tutorial

Material needed:
  • T-shirt (or jersey knit) material, old t-shirts and other knit clothing works well.
  • Matching thread
  • Basic Sewing Supplies
  • (Optional) Sewing Machine
  • Velcro or snaps
  • (Optional) Embellishments, like small buttons or ribbons.
  • (Optional) Patience

Here's the pattern. It includes the patterns for the t-shirt as well as shorts and socks, but those will come later. The t-shirt is made exactly the same way as my Msd sized t-shirt tutorial. If you've made those before, then this will be a breeze for you. If you haven't then please check out my tank top video tutorial, it demonstrates some of the techniques need to sew these shirts. Plus, it's fun to watch. 

Cut out the pieces from your t-shirt material.

With right sides together, pin the back pieces to the front at the shoulders and sew across.

Now get the sleeves and hem them.  You only need to fold once to hem since t-shirt fabric doesn’t unravel. 

And if you are sewing by hand, be sure to sew using a back stitch (as demonstrated in the video), so the hem will be able to stretch without snapping threads.


Once hemmed, you can carefully pin on the sleeves and sew (using the back stitch again).  I say carefully because if you don’t pin carefully around the curves of the sleeve and shoulders, then the ends won’t match up.

It is a good idea to try the shirt on your doll to make sure it fits well at he shoulders.  Re-sew if necessary.


I find it easier to stick the pins in this way when sewing curved pieces, how about you?

Once sewn, it is helpful to cut little notches in the seam allowance as shown, this keeps the fabric from puckering when you turn it right side out.

Anyway, with the shirt right side out, take the collar and fold it in half long ways.  Then, carefully pin it along the edge of the neckline.  Once pinned, sew on using a back stitch.

After sewing, turn the collar and top stitch (back stitch again) to keep it nice and flat.  You may feel the need to cut off some of the excess fabric.

This is a good time to add any decorations or embellishments to the front of the the t-shirt.

Now‘s the time to do the side seams.  With right sides together, pin along the sleeves and down the sides.  Be sure to try the shirt on your doll before sewing it down.

After turning right side out, fold and hem the edges of the back opening.

Now fold and hem the bottom of your shirt.

Try the shirt on your doll to decide where to add the Velcro or snaps, and attach accordingly.

And now your t-shirt is finished.


Give it a try:
Read More »

Sunday, September 16, 2018

Of Bjd Fashion: Pink Sweater Set with Navy Skirt and a Tutorial

This post may contain affiliate links, please check out my disclosures page for more info.  Thanks!


Our dear little Momoko had a birthday several months ago that quite dreadfully went on forgotten, until now.

Anna has designed and sewn an adorable little outfit for this joyous occasion.

A yosd ball jointed doll wearing a cute pink sweater set with a navy blue a-line skirt and a bow pin on the sweater.  We will learn how to make this cute outfit.

It consists of a sweet pink sweater and knit top with a navy blue skirt and white bow.  The outfit it most becoming on Momoko.

Underneath the cute pink sock sweater, the doll is wearing a sleeveless knit top to match.  It makes for a classic sweater set.

Since we are in Arizona with temperature still soaring even this late in summer, Anna was thoughtful enough to make the knit top sleeveless.

And in her generosity, Anna also developed patterns and a tutorial, so others can sew this adorable outfit for their ball jointed dolls.


Sweater Set with Half Circle Skirt for Yosd Bjds Tutorial

Materials needed:


Yosd Bjd Sleeveless Knit Top and Half Circle Skirt Pattern with Tutorial

Here is the pattern for the knit top and half circle skirt.  You will also need my yosd sock sweater pattern, but that will come later.

Cut out your pieces according to the sleeveless top pattern.  Use a cute sock or a light weight knit fabric.

First cut out the piece for the top from a knee sock or knit material.  You have two option for the collar piece.  You can cut using the pattern as is and fold it in half before sewing, or cut a piece along the edge of the sock.  The ribbed sock edge looks nice and you save on fabric because it only needs to be half as wide.

Pin the front piece to the back pieces at the shoulder and then sew.

Anyway, start by pinned the front and back pieces at the shoulder and sew.  If sewing by hand, you will need to sew using a back stitch.  Check out this video tutorial for doll tank tops if you don’t know how to do a back stitch.

Pin and sew around the arm holes to hem them.

Now hem the arm openings (fold and pin along the edge before sewing them).

Sew using a backstitch whiling facing the good side, it makes it look nicer.

When hemming with a backstitch, you want to sew while facing the outside of the piece because the stitches on the underside are kind of ugly.

Getting ready to sew the neckline, you can use the edge of the sock for a cute touch.

Now let’s get to that neckline.  Remember, if you cut the whole pattern piece for the collar instead of using the ribbing, you need to fold it in half before attaching to the shirt.

Start by pinning the collar at the center and ends of the neck opening.

Start pinning the “collar” to the top.  I first pin at the center and both ends.

Continue pinning the collar to the shirt and then sew in place..

Then I finish pinning the rest of the collar.  Carefully sew while removing the pins.


Turn up the collar and pin in place before topstitching along the the edge.

Turn the collar up so it lays flat and pretty and pin in place.  Stitch along the edge (top stitching!), so it stays nice and pretty.

Pin the sides of the top and sew.

Now it’s time to sew up the sides of the top.  This is also a great time to try it on your doll (if you haven’t already) to make sure it fits.  Adjust as needed.

Pin and sew the bottom to hem.

Almost done now.  Pin and hem the bottom.

Repeat to hem the back opening of the shirt, then sew on velcro or snaps to finish.

Repeat on the back opening.  Then you can sew on snaps or Velcro, or whatever ever closure you like.

After sewing on the velcro and snaps, the top is ready to wear.

And now the top is ready to wear!

Follow the tutorial link to make a cute matching sock sweater to complete the doll sweater set.

To make the sweater, just download the pattern from this post.  There’s a pattern for both Msd and Yosd sized sweaters along with a link to the original SD sized sock sweater tutorial.

Follow the tutorial link for instructions to make the half circle doll skirt to go with the sweater set.

As for the skirt, just follow the instructions in my msd sized half-circle skirt tutorial.

The tiny ribbon bow is detachable.

And now the finishing touch, the bow pin.  Just tie a simple bow from a bit of ribbon and add it to the sweater.

On the back of the bow is a tiny gold safety pin sewn on to make a doll sized bow pin.

You can just sew it to the sweater, but if you sew on a tiny gold safety pin it suddenly become a nice removeable bow to use in other outfits.

The completed ball jointed doll outfit of sleeveless pink top, matching pink sweater, navy blue skirt and ribbon pin.

And with that, the outfit is complete and ready to be worn by your doll.  Take tons of photos and enjoy!

End of tutorial.


(Anna, next time please arrange for the birthday doll to receive her gift at least during her birthday month!)

(Okay, but just remember that it’s difficult enough to keep track of all these dolly birthdays let alone plan gifts.  It would be easier to just give cards instead.  Is that what you want for your next birthday?)

(…On second thought, just do your best.)


Give it a try:


Read More »

Wednesday, June 6, 2018

Of Bjd Fashion: Faux Button Down Tank Top and Skirt for Misako with a Tutorial

This post may contain affiliate links, please check out my disclosures page for more info.  Thanks!

Our newest doll, Misako has gone far too long without a decent set of clothing.  Therefore, I am pleased to find that Anna has finally sewn a new outfit.

A msd sized ball jointed doll (Misako) wearing her new outfit.  A button down tank top, floral print half circle skirt, pearl necklace with matching bracelet, and large lacy hair barrette.  She also is wearing her shoes and tights from before.

And doesn’t it look marvelous on Misako.
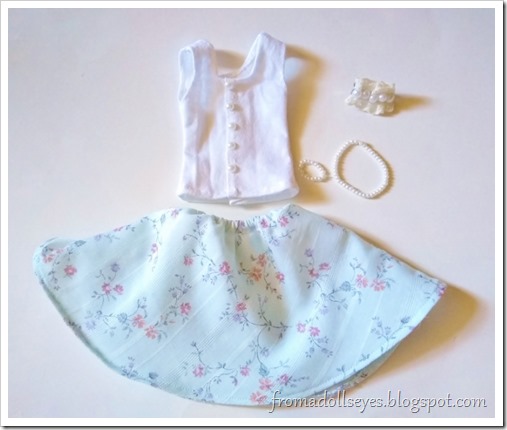
The complete new doll outfit laid flat.  You can easily see how wide the half-circle really is.

It consists of a casual sleeve-less top (she means a tank top), a floral half circle skirt, and a few accessories.  We will get to those momentarily.

I am concerned about the skirt.  It was made from the same fabric as one of my fine skirts.  Yet, I distinctly recall Anna promising to use the rest of said fabric to make a dress for me, preferable similar to this fine dress she made for herself.

No worries Hikaru, I still have more than enough to make a dress.  (Plus, I technically never promised to make it, you just decided on your own that I would make it and I went along.)

That is such a relief, maybe there’s enough left for accessories?

Anyway,  Anna decided to create tutorials and printable patterns for the “tank top” and skirt.  So others could sew this delightful warm weather Outfit.


Faux Button Down Tank Top and Half Circle Skirt for MSD Bjds


The Tank Top

A close up of the tank top as worn by the doll.  We will learn how to make this easy casual top for msd bjds.

Let’s start with the tank top.  It was designed to be a “faux” button down because I love the look but hate making button holes.

Plus, the overlapping fabric in front is kind of bulky on a doll.  Something I don’t want on things like light and airy tank tops.

You will need:
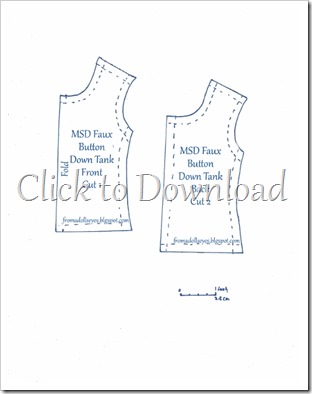

Msd Ball Jointed Doll Faux Button Down Tank Top Pattern

Here is the pattern for the tank top.  It was made based on Misako’s measurements which are post on the doll’s profile page.  It is intended to fit a little loosely though for a comfortable fit.
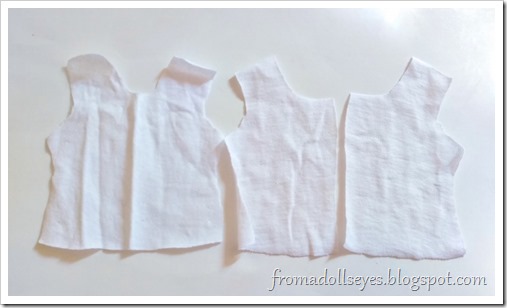
The cut pieces from the pattern for the tank top.  Two for the back and one for the front.

First cut your pieces according to the pattern from the t-shirt fabric.  One front piece and two back pieces.

Pin the shoulders of the front and back pieces together, then sew by hand or machine.

Pin the front pieces to the back at the shoulder a sew.
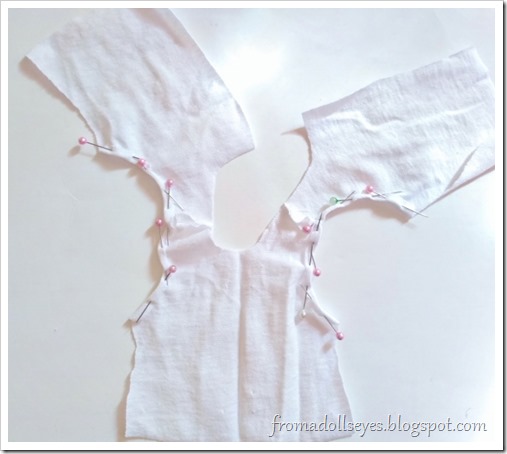
Pin and hem the arm hole area of the top on both sides.  Only have to fold once because t-shirt fabric doesn't unravel.

Then pin and hem the arm area of the top.  You only have fold edge once to hem since t-shirt fabric doesn’t actually unravel.

I sew the hem by hand using a back stitch so that the stitches will stretch with the fabric.  I sew from the right side so the outside stitches will look nice.

I hem by hand front the front side of the fabric using a back stitch (check out this doll tank top video tutorial for a demonstration of the back stitch.)

I use the back stitch so it will stretch with my fabric, and I sew from the front because the stitches look weird on the other side.  I want the weirdness on the inside of the top.

Make a fold down the front of the top and pin in place before sewing two rows of the stitches down the front to hold the fold in place.  This gives the shirt the look of a button down with out the trouble of sewing button holds or extra layers.

Anyway, here’s the interesting part.  You fold the fabric on itself in the center of the front and pin in place. 

A close up of the folded fabric from the side.  The fabric forms an S shape.

This is what the fabric should look like when folded.  The fold is only about 1/4 inch (about 1/2 cm.) wide, but you may need to make it wider to better fit your doll.
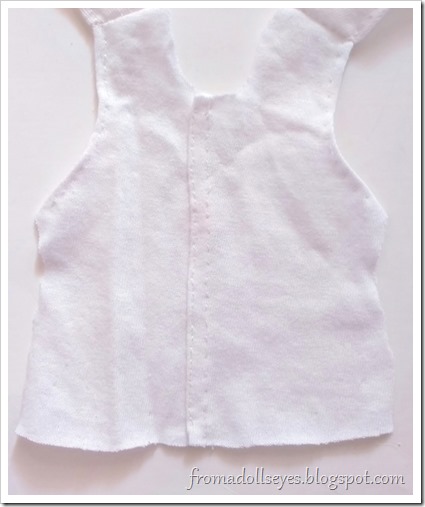
Here's the finished front of the shirt.  The rows of stitches are only a few milimeters apart because the folded fabric isn't very wide.

Sew the fold in place by making two rows of stitches down the front of you top.
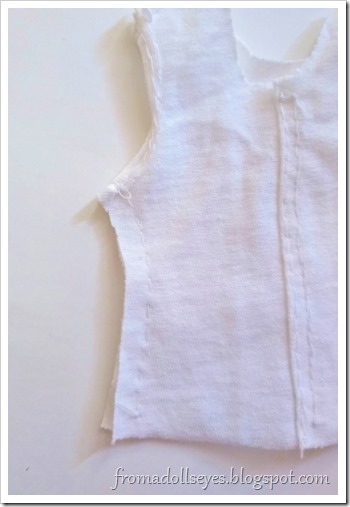
Pin and side up the sides of the shirt.

Moving on, pin and sew the sides of your top.  Don’t forget to try the shirt on your doll before sewing to ensure a good fit.

Pin and hem the bottom edge of the shirt.  We only need to fold and pin once just like the arm holes.

Pin and hem the bottom of the tank top, just like we did with the arm area.
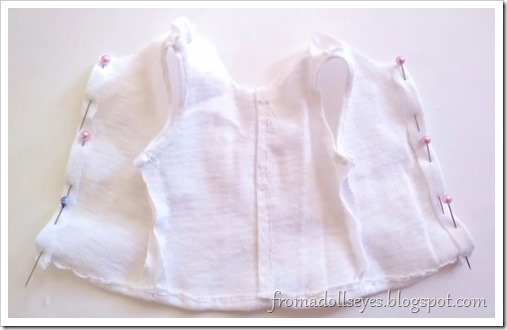
PIn and hem the back opening of the shirt.  Afterwards, we need to pin and hem the neckline, but a picture of this is missing.

Hem the back opening too, and lastly hem the neckline (I didn’t get a picture of that step).

Cut two or three small pieces of Velcro and sew in place to close the top.  You can use snaps too.

After hemming everything, sew on your closure of choice.  I prefer to cut two small pieces of soft Velcro and sew them on by hand.  Small snaps are a great choice as well.
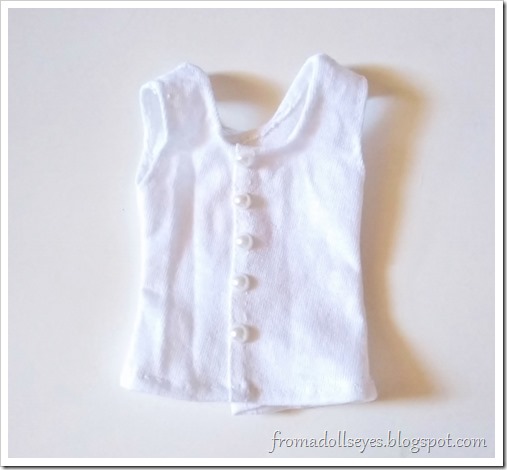
Finish the top by sewing or gluing on small beads, flat back pearls/gem or tiny buttons down the front.  Add any other embellishments.

Finish off the top by adding buttons.  I glued on flat back pearls using Aleene’s Jewel-it.  I also recommend tiny faux pearls and other tiny beads.

Add any other embellishments you want like lace, ribbon bows, flowers, etc.


The Half Circle Skirt

A pretty floral print half circle skirt for a msd sized ball jointed doll.  The tutorial and pattern follows.

This half circle skirt was actually based on this tutorial for a knit skirt (intended for humans).  It’s a useful tutorial, especially if you want to make a skirt for someone larger or smaller in size.  I recommend using the hip measurement instead of the waist, and adding a little extra for a seam allowance if you aren’t sewing with a knit fabric.

Anyway, let’s get going on this skirt tutorial.

You will need:

  • Pretty fabric
  • (Optional) fabric for a lining if your fabric is thinner.
  • Thin elastic
  • The pattern below
  • Basic sewing supplies
  • Small safety pin
  • (Optional) Sewing machine if you don’t want to sew by hand.


MSD Ball Jointed Doll Half Circle Skirt Pattern with Tutorial

Here is the pattern for the skirt.  Like the tank top, it was made based on Misako’s measurements which are listed on the dolls’ profile page.

The cut out piece for the half circle skirt.  There actually two layers of fabric here instead of one because this fabric is very thin.  They will be treated as only one layer, it's cheater method of making a "lining".

Cut one piece of fabric out of the pattern.  My fabric is a bit sheer, so I also cut a piece of lining fabric. 

However, I’m cheating at making a lining.  The two pieces are layered on top of each other and I am pretending they are just one piece of fabric instead of two.

Hem the bottom of the skirt.  Then double fold the top and sew to form a casing for the elastic for the waist.

Start by hemming the bottom edge of the skirt.  This fabric does fray, so you will need to double fold to hem.

You will also double fold and sew the top edge of the skirt to create a casing for your elastic.  Make sure it is large enough for the elastic.
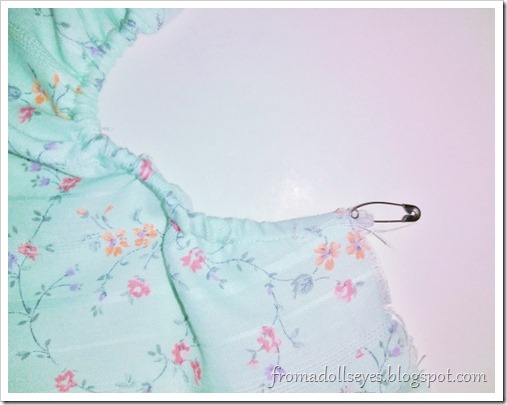
Use a tiny safety pin or other tool to thread thin elastic through the casing.  Pin the ends of the elastic at each end of the casing.

Use a safety pin to thread the elastic through the casing.  You can used other tools instead, check out this doll tank top video tutorial for some examples.

Pin the elastic on each end of the skirt to secure it.

Pin the end of the skirt together and sew the back seam.  Sew at the top of this seam thoroughly because this secures the elastic for the waist.

Now pin the ends of the skirt together and sew.  In one step you can sew both the elastic and the back seam.

The completed doll sized half circle skirt.  It's half a circle, but flares out nicely for an a-line shape.

And now the skirt is ready to wear.  You can also add other details like bows and lace.

Now you have a new doll outfit that’s perfect for Spring/Summer.  Enjoy!

End of tutorial.


Now let us discuss the accessories. 
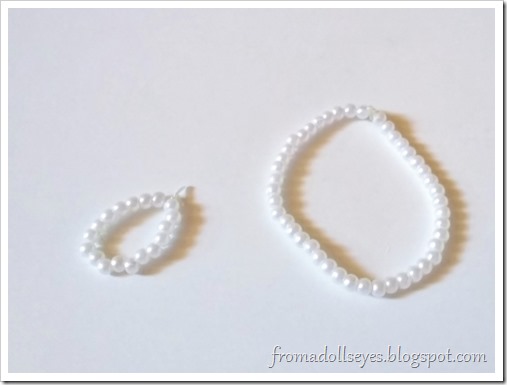
A set of doll sized faux pearl jewelry.  A necklace and bracelet made with small beads and elastic.

First we have this fine pearl jewelry set.  A necklace and matching bracelet made simply by threading 4 mm. faux pearls on elastic thread.

A hair clip for a doll made with pretty gathered lace and flat back pearls glued down the center.

To accentuate the hair, there is also this lovely hair clip, made from gathered lace and a few more pearls.

A close up of the side of the doll sized hair clip showing off the small barrette used as a base.

The base of this hair piece consists of a small barrette Anna purchased from a local craft store.
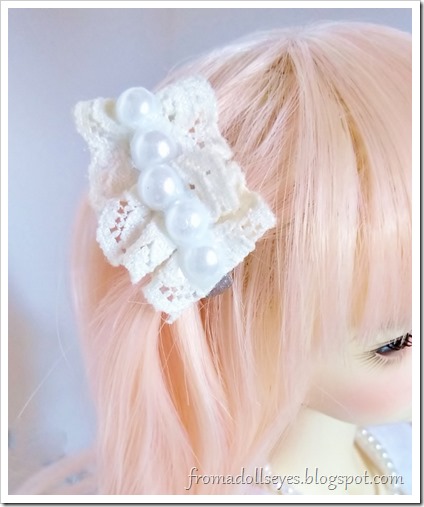
A close up of the hair clip worn by Misako.

See how lovely it looks in Misako’s hair.

Side view of Misako wearing her pretty new doll clothes and accessories.

The accessories do so much to complete this lovely new outfit.
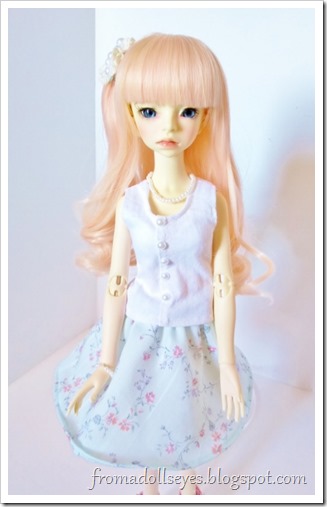
A final front view of Misako the bjd wearing her new outfit.  It complements her softly curled hair and figure nicely.

Misako does seem pleased with her new clothing.  Though it is quite difficult to know for certain since she still doesn’t speak to anyone, especially not to myself. 

Oh well, she is finally appropriately dressed and that is what really matters.  And perhaps someday she will open up.

Until then, be at peace my dear readers.


What Misako is really thinking.

A shot of Misako's face.  She is thinking over what happened today.

“It was nice of her to make me this pretty stuff, but why?  I thought that white dress was nice.

And why does the noisy white haired doll fuss so much about it?  Maybe she wants more clothes too? If I asked her would she get mad?  Or would she make even more noise?  I don’t want that to happen. :(”

Read More »

Popular Posts